Creating a Personal Browser Filter Across All of Your Devices
If you're familiar with the popular browser extension, uBlock Origin, you may have seen or used its element picker to remove elements on the page that are of no use to you, are distracting, clutter the page, or just offend your very reasonable and not at all problematic variety of personality disorders.
If you use any kind of adblockers like adguard, pi-hole, pfblockerng, nextDNS, etc, you've been using manicured lists that filter known problematic domains or parts of the internet that can be malicious, annoying, pornographic, but ultimately unwanted. Some of these tools can be more aggressive than others.
The goal of this post is to create your own client-side personal filter list, hosted online, that you can import into any and all of your devices, on desktop or mobile. How much control you can exert will depend on what services, tools, browsers, and operating systems you use.
What's unique about this list is that it loads directly in your browser and has the benefit of filling gaps that a DNS level sinkhole may let through.
This is just an example of tools you'll need to get started:
- Firefox w/uBlock Origin installed
- on Desktop and/or Android
- AdGuard Pro (paid - thankfully for now, not a subscription)
- on Safari (iOS, iPadOS, and/or MacOS)
- A Github account (or a syncing service like Dropbox)
All of these tools have comparable options so feel free to mix and match whatever works best for you. There are likely free adblockers on iOS that allow importing custom filters.
Ultimately, what we're doing is using your adblocker's element picker to manually declutter webpages in your browser. Then rather than hosting those filters locally in your browser, we'll host them on Github and import them across all of your devices so that they all benefit. If you don't find that useful, then the rest of this post will definitely be a waste of your time.
Set Up Your Cloud Hosted Filter
This can be done on mobile, but this section will be described as if you're on a desktop browser. Assuming you have a Github account setup already, go to the 'Repositories' page, create a new repository, and give it a repository name like browser-settings, or personal-filters, or whatever. Make sure it's set to Public, but you can leave everything else default or customize it however you like. Setting it to private will lead to problems down the road.
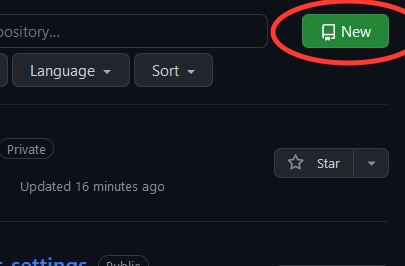 Now that you're in your repo, to the left of the 'Code' drop down menu, click the '+' or 'Add file' button to create a new file.
 Above the input box, name this file my-trivial-attempt-at-decrappifying-the-internet.txt or my-filter.txt or whatever. The .txt file extension is important. Let's leave this browser tab open for now.
Declutter Time
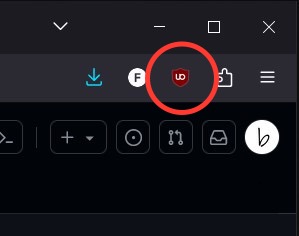
Now navigate to a site you frequent often. One that specifically has some elements that your brain automatically overlooks because they were put there to sell you something, clutter the screen, and slow down page load. Click the uBlock icon in the toolbar and select the eyedropper icon (to enter element picker mode). You may need to expand the uBlock Origin menu by clicking 'More ∨' a couple of times.
 Now when you click an element you'll see an outline highlighting that element. Use the sliders in uBlock's bottom corner menu that opens up to expand or shrink how much of the element you want to remove. Hit the preview button if you want to verify that it looks right, then click Create when done, or quit or Esc to redo it. Magic. Now go to town on it. The goal is to purge all the crap. Then find another site. Wreck that one too. Every time you remove an element, you're adding a filter to uBlock Origin's 'My filters' list.
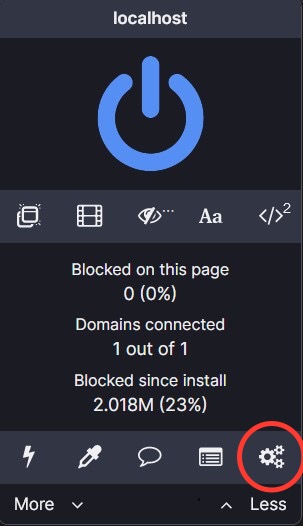
Now that we have some filters to work with, click on the uBlock Origin icon in the toolbar again. In the bottom right corner of the submenu, you should see a 'gears' icon to open the dashboard.
Now when you click an element you'll see an outline highlighting that element. Use the sliders in uBlock's bottom corner menu that opens up to expand or shrink how much of the element you want to remove. Hit the preview button if you want to verify that it looks right, then click Create when done, or quit or Esc to redo it. Magic. Now go to town on it. The goal is to purge all the crap. Then find another site. Wreck that one too. Every time you remove an element, you're adding a filter to uBlock Origin's 'My filters' list.
Now that we have some filters to work with, click on the uBlock Origin icon in the toolbar again. In the bottom right corner of the submenu, you should see a 'gears' icon to open the dashboard.
 Look for the 'My filters' tab and you'll see a text file with all the elements you've just removed along with any that you may have removed years ago because you forgot you've already done this at one point but time, just like your memory, just keeps slipping away. Cut and paste all the text in this text field into the filter.txt file you created earlier in Github. There's no need to keep these rules in the browser's local uBlock Origin filter txt file as they'd be redundant. It's probably ok either way. Let's also leave this browser tab open.
You're in the Cloud
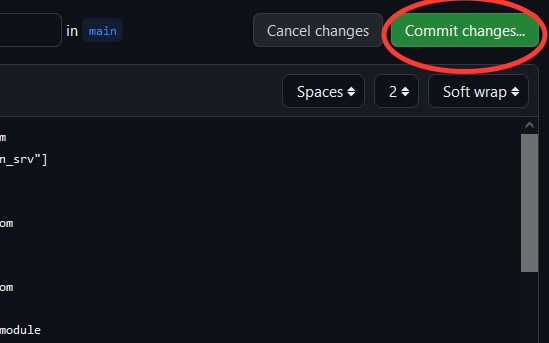
Now in Github, you have some text in your filter.txt file. Feel free to add more filter rules or just hit 'Commit changes' in the top right corner. Github is usually pretty good at making up a generic commit message. Leave everything else default or customize it if you feel like it, and hit Commit changes.
 We now have the same rules hosted in Github rather than being stored locally in uBlock Origin's filters settings. After committing the updates, you'll see the filter.txt file in the files section of your repo. Click on it to open it. You can click the 'pencil' icon to add or remove more filters but for now click the 'Raw' button.
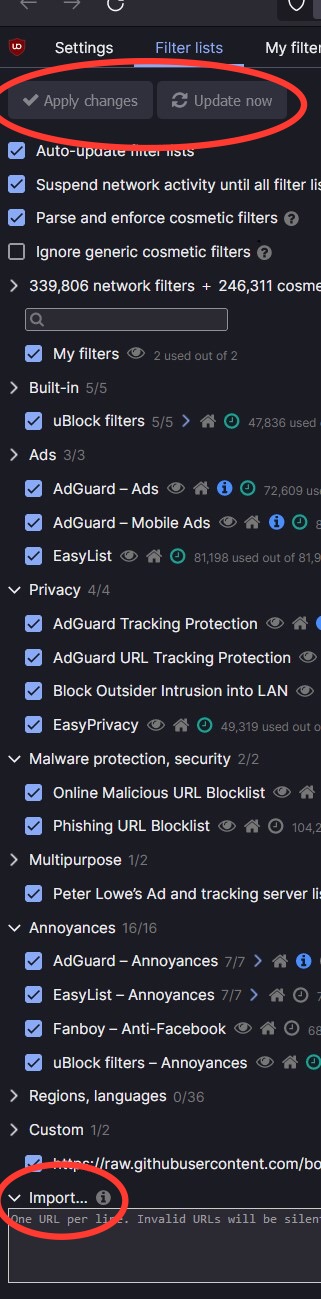
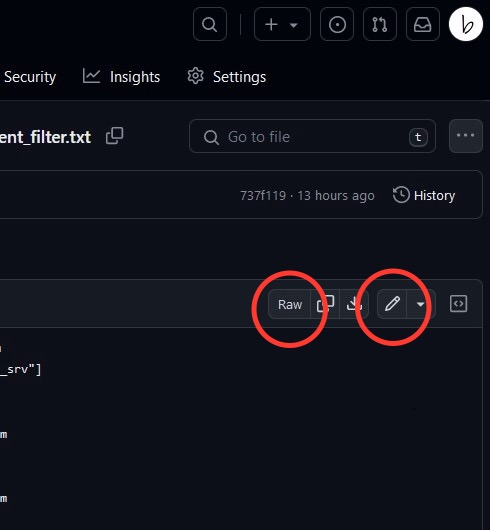 Copy the link in your browser's address bar. Back over in the uBlock Origin dashboard settings, next to the 'My filters' tab click the 'Filter lists' tab. Scroll to the bottom and click 'Import...'. Paste the link to the raw text file in the input box, then scroll to the top and click 'Apply changes'. Then click 'Update now'. That's pretty much it.
 To recap. We used uBlock Origin's element removal feature to build a custom filter locally for our current browser. We instead moved those filters over to a file hosted in Github, then imported the list as a url back into uBlock Origin. You should see that the effect is the same. Why did we do all that? Chill, we're getting there.
Rinse and Repeat
Now we can go over to any other devices and import that same txt link from Github into every other adblock extension you have installed.
-
On desktop, uBlock Origin across different operating systems and browsers should all look the same. Open the uBlock Origin dashboard, find the 'Filter lists' tab and import the link at the bottom. Remember to apply changes and update/refresh.
-
uBlock Origin in Firefox on Android should look the same as on desktop. In the bottom right corner tap the 3 dots, then 'Add-ons', then uBlock Origin (assuming you have it already installed), then settings, then finally the 'Filter lists' tab, scroll to the bottom to import the link. Remember to apply changes and update/refresh.
-
On iOS/iPadOS, we unfortunately don't get uBlock Origin. Instead we'll use Adguard Pro here, but again, any decent adblocker will have a way to add custom filter lists. Make sure you have Adguard enabled in your Safari extensions (allow on all sites is fine). Open the Adguard app, tap the 'Protection' tab at the bottom (the shield with the check mark inside), then click on 'Safari Protection'. Make sure it's enabled, then tap 'Filters'. Scroll to the bottom and tap 'Custom'. Enable it and click 'Add a filter'. Paste in the same link to the raw text file from Github, tap next and name it whatever. Tap on the 'Home' tab in the bottom right to bring you back to the main screen. You may need to hit the refresh icon in the top right corner if you don't see a status bar that rules are being converted or something similar.
Updating Your List
We're hosting a txt file in Github that should contain all of our personal filters. Now that we've imported them into all of our respective adblock extensions across all of our devices, anything we put into that list will propagate automatically. Wow was that tedious. Was it worth it, meh. Certainly excitedly explaining the process to your significant other is a bad idea. We've gone this far, now let's update the list.
The 'My filters' in uBlock Origin should be empty now because we moved all the rules to our Github file. But anytime you find a page you want to declutter and start removing elements, those filters end up in your 'My filters' list in your adblocker's dashboard. Just cut and paste those every once in a while into your filter.txt file in the repo you created in Github. Bookmarking that page in your browser helps. Your other devices will automatically get those updates the next time their respective adblockers refresh their filters, usually 24-48 hours, or manually if you're testing it out.
Adguard Pro is nice in that it also let's you block elements on a page. In Safari on iOS, in the address bar, tap the 'jigsaw' icon to open up your extension list. Scroll to find Adguard, then tap 'Block elements on this page'. Tap 'Start' to enter element blocking mode. Tap the element you want to remove, use the small cross icon to shrink, the box icon to expand, the eye icon to preview, and the check icon to confirm. You should be redirected to the Adguard app. To see the rules you just created, tap the shield, tap on 'Safari Protection', and just below 'Filters', you should see 'User rules'. In the top right corner, tap the three dots, then 'Open editor'. Here you can cut and paste those into your Github filter.txt file. Alternatively, instead of opening the editor you can export those user rules as a txt file to a synced folder on your desktop if that's easier than trying to manipulate all that data on a small phone with all its tiny buttons.
Finishing Touches
Everything should be fully functional, but you'll notice that anytime the filters get updated periodically, the title will be blank no matter how many times you input it manually. That's because that title is stored in the my-filters.txt file in Github. To give your list a title, edit the file in Github and at the very top of the file insert something like:
! Title: Personal Filters
! Description: Removes annoyances on various websites.
Any text that falls after an ! is considered a comment and will be ignored by your adblocker. The Title and Description is basically metadata that the adblocker will insert the next time the filters get updated.
Wrapping Up
There are definitely many variations to this kind of approach. If you can think of a way to automate the process of moving filters periodically from your browser to a cloud hosted file, then good for you dude, good for you. You may be able to use syncing services like iCloud, Nextcloud, Dropbox, Syncthing, etc. to also accomplish this same task.
Once I learned this trick I started going nuclear on websites. The more frequently I visit a site, the more time I put into decluttering it. It's not perfect as sometimes sites have mobile versions that can be pretty stubborn, but for the most part it works.
Bonus link and the inspiration for this post:
https://christitus.com/remove-youtube-shorts/
Other great Firefox extensions to check out that clean up sites:
Bring Twitter Back
Minimal Theme for Twitter/X
Reddit Enhancement Suite
SponsorBlock
DeArrow
Return Youtube Dislike
Unhook
Youtube Tweaks
iCloud Bookmarks
On Safari:
Adguard Pro
StopTheMadness
Vinegar
Baking Soda
SponsorBlock
DeArrow
And the absolute GOAT:
uBlock Origin
We spend a lot of time on the internet. All these folks have put a lot of time and effort into making it a better place. Maybe throw some money their way. If you have questions about how to sync data across different devices and ecosystems, questions about anything I might have skipped over, ways to make this workflow less tedious, or anything else, find my contact info down below.
Links below for questions and comments.